
안녕하세요 여러분!
이번 포스팅은 Hydra 시리즈의 마지막으로서, 간단한 ML 실험 실습 시간입니다 
이전 포스팅에서 설명 드린 Hydra 설정을 기반으로 실습이 진행됩니다
train.py
이미지 분류에 대한 Task, 즉 모델 학습은 train.py 을 통해 진행됩니다.
따라서, 해당 파일의 코드를 한 번 살펴보도록 하겠습니다.
# ./train.py
import hydra
from hydra.utils import instantiate
from omegaconf import DictConfig
from pytorch_lightning import Trainer
from pytorch_lightning.callbacks import ModelCheckpoint
from pytorch_lightning.loggers import TensorBoardLogger
from config_schemas.config_schema import setup_config
@hydra.main(config_path="configs", config_name="config", version_base="1.2")
def train(config: DictConfig) -> None:
data_module = instantiate(config.data_module)
task = instantiate(config.task)
# Create the logger
tb_logger = TensorBoardLogger("tb_logs", name="cifar10")
# Create the checkpoint callback
checkpoint_callback = ModelCheckpoint(
monitor="validation_accuracy",
dirpath="checkpoints/",
filename="cifar10-{epoch:02d}-{val_loss:.2f}",
save_top_k=3,
mode="max",
)
# Create the trainer
trainer: Trainer = instantiate(config.trainer, logger=tb_logger, callbacks=[checkpoint_callback])
# Fit the model
trainer.fit(model=task, datamodule=data_module)
# Test the model
trainer.test(model=task, datamodule=data_module)
# Run the train function
if __name__ == "__main__":
setup_config()
train()
Python
복사
본 코드는 크게 두 가지 메인 로직이 존재합니다.
•
Config store에 각 컴포넌트의 설정 노드를 저장 → setup_config() 메소드
•
Config store에 저장된 설정 노드를 통해 Task를 수행 → train() 메소드
setup_config 메소드
이전 포스팅에서 설명드린 Total task 컴포넌트의 설정을 config store에 저장하는 역할을 수행합니다.
해당 컴포넌트는 Task, Data Module, 그리고 Trainer 컴포넌트로 구성되어 있다고 설명 드렸습니다.
따라서, 해당 컴포넌트의 설정을 연쇄적으로 저장합니다.
마찬가지로, Task의 경우도 여러 컴포넌트로 구성되므로, 하위 계층의 컴포넌트 설정도 똑같이 저장합니다.
결과적으로, 전체 컴포넌트의 설정 정보를 config store에 저장하게 됩니다.
train 메소드
Hydra를 통해 사전에 정의한 실험 설정을 로딩하고, 이에 맞게 모델 구축 및 학습&평가를 수행합니다.
가장 먼저 확인할 부분은 hydra.main 데코레이터 입니다.
•
config_path: 설정 yaml 파일이 존재하는 경로를 지정하는 부분입니다.
•
config_name: yaml 파일의 이름을 명시하는 부분입니다.
지정한 yaml 파일로부터 설정 값을 불러온 다음, train() 메소드의 config 인자로 값을 넘겨주는 역할을 수행합니다.
이때, config에는 Total task 컴포넌트, 다시 말해 전체 프로젝트의 설정 정보가 있습니다.
그 다음으로 확인할 부분은 instantiate() 메소드입니다.
해당 메소드를 호출하여, ML 실험에 필요한 모든 컴포넌트를 인스턴스화할 수 있습니다!!!
위 코드에서는 Task, Data Module, 그리고 Trainer 클래스에 대한 객체를 생성한 것을 확인할 수 있어요
저는 추가적으로 TensorBoard Logger를 Trainer 객체에 추가하여, 모델 학습 및 평가 과정을 추적할 수 있게 설정하였습니다.
Hydra를 통해, 모델 학습 코드와 실험 설정 파트를 완벽하게 분리한 것을 확인할 수 있습니다.
따라서, 다음과 같은 효과를 얻을 수 있어요!
- 모델 학습 코드의 로직이 간결해졌으며, 코드 수정 빈도를 대폭 줄일 수 있습니다.
- 실험 설정이 변경되더라도, 모델 학습 코드는 영향을 받지 않습니다.
결론적으로, 아래의 디자인 패턴을 통해 탄탄한 코드를 구성할 수 있습니다.
- 단일 책임 원칙 : 각 클래스(또는 컴포넌트)는 하나의 책임만 가져야 한다.
- 의존성 주입 : 다른 클래스의 객체가 필요한 경우, 외부에서 해당 객체를 주입한다.
디버깅
제가 생각하는 Hydra의 가장 큰 장점 중 하나는, 실험 설정 디버깅입니다.
실험의 규모가 커질수록, 다루어야 하는 파라미터의 종류도 증가합니다. 나중에는 실험을 설계한 사람도 어떤 파라미터를 수정할 수 있는 지 헷갈리기 쉽습니다.
Hydra는 컴포넌트의 구조 및 세부 파라미터 정보를 가독성 있게 명시함으로써, 이러한 문제를 해결해줍니다.
$ poetry run python train.py --cfg job
task:
_target_: tasks.MNISTClassification
optimizer:
_target_: torch.optim.Adam
_partial_: true
lr: 5.0e-05
betas:
- 0.9
- 0.999
eps: 1.0e-08
weight_decay: 0.2
amsgrad: false
model:
_target_: models.SimpleModel
backbone:
_target_: backbones.ResNet18
pretrained: true
adapter:
_target_: adapters.LinearAdapter
in_features: 512
out_features: 10
flatten_input: false
head:
_target_: heads.IdentityHead
loss_function:
_target_: torch.nn.CrossEntropyLoss
data_module:
_target_: data_modules.MNISTDataModule
batch_size: 64
num_workers: 8
data_dir: ./data/mnist
pin_memory: true
drop_last: true
trainer:
_target_: pytorch_lightning.Trainer
max_epochs: 10
precision: 16
log_every_n_steps: 10
accelerator: gpu
devices: auto
Bash
복사
터미널에서 hydra.main 데코레이터가 포함된 파일(여기서는 train.py)을 수행할 적에, --cfg job 키워드를 추가하면 됩니다!!
위 결과와 같이 현재 실험 설정의 기본 값을 확인할 수 있습니다. 여기에는, 각 컴포넌트의 구성 요소와 컴포넌트가 참조하는 클래스 정보가 (_target_ 키워드) 포함되어 있어요
참고로, 아래와 같이 --help 키워드를 통해서 수정할 수 있는 파라미터 목록을 열람할 수 있습니다.
$ poetry run python train.py --help
train is powered by Hydra.
== Configuration groups ==
Compose your configuration from those groups (group=option)
data_module: cifar10, cifar10_data_module_schema, mnist, mnist_data_module_schema
task: cifar10_classification, cifar10_classification_task_schema, mnist_classfication_task_schema, mnist_classification
task/loss_function: cross_entropy, cross_entropy_loss_function_schema
task/model: cifar10_model, cifar10_model_schema, simple_model, simple_model_schema
task/model/adapter: linear_2048_10, linear_512_10, linear_adapter_schema
task/model/backbone: resnet18_schema, resnet34_schema, resnet50_schema
task/model/head: identity_head, identity_head_schema
task/optimizer: adam, adam_optimizer_schema, sgd, sgd_optimizer_schema
trainer: cpu, gpu, trainer_schema
== Config ==
Override anything in the config (foo.bar=value)
task:
_target_: tasks.CIFAR10Classification
optimizer:
_target_: torch.optim.SGD
_partial_: true
lr: 5.0e-05
weight_decay: 0.2
model:
_target_: models.CIFAR10Model
backbone:
_target_: backbones.ResNet18
pretrained: true
adapter:
_target_: adapters.LinearAdapter
in_features: 512
out_features: 10
flatten_input: false
head:
_target_: heads.IdentityHead
loss_function:
_target_: torch.nn.CrossEntropyLoss
data_module:
_target_: data_modules.CIFAR10DataModule
pin_memory: true
drop_last: true
batch_size: 64
num_workers: 8
data_dir: ./data/cifar10
trainer:
_target_: pytorch_lightning.Trainer
max_epochs: 10
precision: 16
log_every_n_steps: 10
accelerator: gpu
devices: auto
Powered by Hydra (https://hydra.cc)
Use --hydra-help to view Hydra specific help
Bash
복사
정말 아름답지 않나요
실험 예시
그럼 이제 Hydra를 기반으로 간단한 ML 실험을 진행해볼게요!
Task의 경우, CIFAR10 이미지 분류 문제를 수행하도록 하겠습니다.
또한, 배치 사이즈는 128, 최적화 알고리즘은 Adam Optimizer를 사용하겠습니다.
그럼 아래 명령어와 같이, 바꾸고 싶은 파라미터 값만 명시해주면 됩니다. 참 편하죠 ㅎㅎ
$ poetry run python train.py task=cifar10_classification data_module.batch_size=128 task/optimizer=adam
Using 16bit None Automatic Mixed Precision (AMP)
GPU available: True (cuda), used: True
TPU available: False, using: 0 TPU cores
IPU available: False, using: 0 IPUs
HPU available: False, using: 0 HPUs
Downloading https://www.cs.toronto.edu/~kriz/cifar-10-python.tar.gz to ./data/cifar10/cifar-10-python.tar.gz
100%|████████████████████████████████████████████████████████████████████████████████████████████████████████████████████████████████████| 170498071/170498071 [00:28<00:00, 6037183.61it/s]
Extracting ./data/cifar10/cifar-10-python.tar.gz to ./data/cifar10
Files already downloaded and verified
You are using a CUDA device ('NVIDIA GeForce RTX 3060') that has Tensor Cores. To properly utilize them, you should set `torch.set_float32_matmul_precision('medium' | 'high')` which will trade-off precision for performance. For more details, read https://pytorch.org/docs/stable/generated/torch.set_float32_matmul_precision.html#torch.set_float32_matmul_precision
/home/jihoahn9303/.cache/pypoetry/virtualenvs/hydra-project-lqNZHqLy-py3.9/lib/python3.9/site-packages/pytorch_lightning/callbacks/model_checkpoint.py:613: UserWarning: Checkpoint directory checkpoints/ exists and is not empty.
rank_zero_warn(f"Checkpoint directory {dirpath} exists and is not empty.")
LOCAL_RANK: 0 - CUDA_VISIBLE_DEVICES: [0]
| Name | Type | Params
-----------------------------------------------------------
0 | model | CIFAR10Model | 11.2 M
1 | loss_function | CrossEntropyLoss | 0
2 | train_accuracy | MulticlassAccuracy | 0
3 | validation_accuracy | MulticlassAccuracy | 0
4 | test_accuracy | MulticlassAccuracy | 0
-----------------------------------------------------------
11.2 M Trainable params
0 Non-trainable params
11.2 M Total params
22.363 Total estimated model params size (MB)
Epoch 9: 100%|███████████████████████████████████████████████████████████████████████████████████████████████████████████████████████| 390/390 [00:08<00:00, 45.98it/s, loss=0.439, v_num=4]
`Trainer.fit` stopped: `max_epochs=10` reached.
Epoch 9: 100%|███████████████████████████████████████████████████████████████████████████████████████████████████████████████████████| 390/390 [00:08<00:00, 45.97it/s, loss=0.439, v_num=4]
Files already downloaded and verified
Files already downloaded and verified
You are using a CUDA device ('NVIDIA GeForce RTX 3060') that has Tensor Cores. To properly utilize them, you should set `torch.set_float32_matmul_precision('medium' | 'high')` which will trade-off precision for performance. For more details, read https://pytorch.org/docs/stable/generated/torch.set_float32_matmul_precision.html#torch.set_float32_matmul_precision
LOCAL_RANK: 0 - CUDA_VISIBLE_DEVICES: [0]
Testing DataLoader 0: 100%|████████████████████████████████████████████████████████████████████████████████████████████████████████████████████████████████| 78/78 [00:00<00:00, 125.38it/s]
────────────────────────────────────────────────────────────────────────────────────────────────────────────────────────────────────────────────────────────────────────────────────────────
Test metric DataLoader 0
────────────────────────────────────────────────────────────────────────────────────────────────────────────────────────────────────────────────────────────────────────────────────────────
test_accuracy 0.7719351053237915
────────────────────────────────────────────────────────────────────────────────────────────────────────────────────────────────────────────────────────────────────────────────────────────
Bash
복사
TensorBoard도 확인해봅시다.
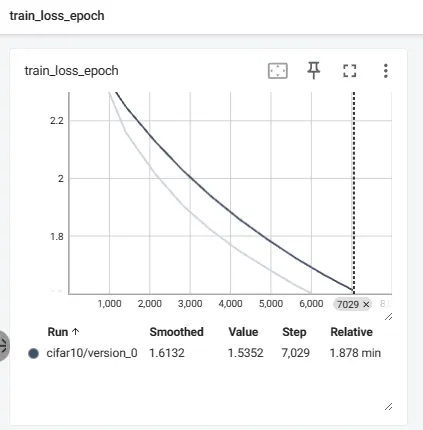
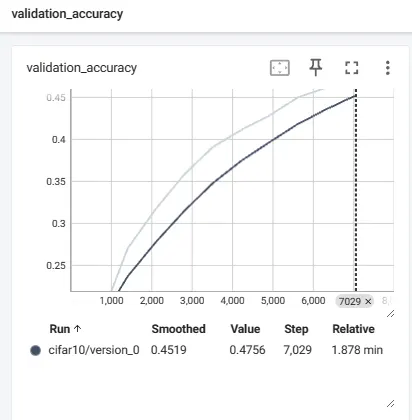
step에 따른 train loss 및 validation metric 값이 그래프로 잘 표현된 것을 확인할 수 있습니다!
정리
본 포스팅에서는 Hydra를 사용하여 실제 ML 실험을 진행하는 방법을 살펴보았습니다!
이와 더불어, Hydra를 사용했을 때의 얻을 수 있는 여러 장점도 확인했습니다.
이제 Hydra를 적극적으로 사용해야겠다는 생각이 드셨는지요
다음에는 또 다른 유익한 주제로 찾아오도록 할게요!
그럼 안녕히 가세요